Clojure on the BeagleBone part 4 - Digital Input with ClojureScript
October 23, 2014 -Intro
- In part 1 of this series we saw how to install Java and Leiningen on a BeagleBone.
- In part 2 we used the BeagleBone to blink an LED on a breadboard using Clojure.
- In part 3 we blinked an LED using ClojureScript.
- In part 4 we read digital inputs via polling and interrupts.
The BeagleBone is a 1GHz ARM board with 512Mb of RAM capable of running Linux. The Debian image ships with node.js and a javascript library in [Bonescript][bonescript] for interacting with the hardware. Clojurescript provides a compiler for Clojure that targets Javascript, here we will use it to and two methods of reading digital input and light an LED on a breadboard using the BeagleBone GPIO.
Reading from digital input via polling
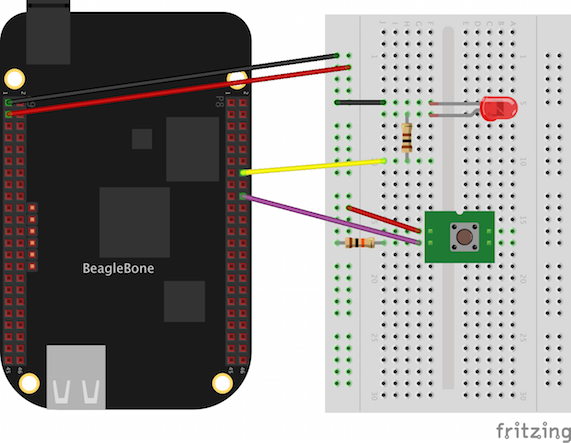
Wire up the LED circuit
- Using a jumper wire connect Pin 1 on Header P9 (ground) on the BeagleBone to the ground rail on the breadboard.
- Place an LED in the breadboard.
- Using a jumper wire connect the cathode (shorter) wire of the LED to the negative rail.
- Connect one end of a 100 ohm resistor to the anode (longer) wire of the LED.
- Using another jumper wire connect the other end of the resistor to Pin 14 on Header P8
Wire up the push button circuit
- Using a jumper wire connect Pin 3 on Header P9 (3.3 volts) on the BeagleBone to the positive rail on the breadboard.
- Place a push button in the breadboard.
- Using a jumper wire connect one lead of the push button to the positive rail.
- Connect a 10K ohm pull down resistor to the negative rail and the button's other lead.
- Using a jumper wire connect Pin 18 on Header P9 to the same button lead we connected the 10k resistor in step four.
Note: The GPIO pins can only handle 3.3 volts, so be very careful that you do not accidentally connect a jumper to one of the 5 volt source pins. If you are unsure of what you are doing I would highly recommend reading the system reference manual to make sure you do not damage your board.
ClojureScript code
SSH into your BeagleBone and create a file named project.clj with the following contents:
(defproject cljs-beaglebone-digital-input "0.0.1"
  :description "Demonstrates reading digital inputs on a beaglebone"
  :license {:name "Eclipse Public License"
            :url "http://www.eclipse.org/legal/epl-v10.html"}
  :plugins [[lein-cljsbuild "1.0.3"]]
  :cljsbuild {
    :builds [{
        :source-paths ["src"]
        :compiler {
          :output-to "lib/digital-input.js"
          :optimizations :simple
          :target :nodejs
          :pretty-print true}}]}
  :dependencies [[org.clojure/clojurescript "0.0-2197"]])
And create a file name src/cljs_digital_input/core.cljs with these contents:
(ns cljs-digital-input.core
  (:require [cljs.nodejs :as nodejs]))

(def bone (nodejs/require "bonescript"))

; Bonescript identifiers related to pins
(def OUTPUT (aget bone "OUTPUT"))
(def INPUT (aget bone "INPUT"))

; Pins
(def led-pin "P8_14")            ; GPIO pin 14 on header P8
(def digital-input-pin "P8_18")  ; GPIO pin 18 on header P8

(defn setup-pins! []
  (.pinMode bone led-pin OUTPUT)
  (.pinMode bone digital-input-pin INPUT))

(defn read-input []
  "Reads state of the digital input pin then turns the LED on or off"
  (let [input-pin-state (.digitalRead bone digital-input-pin)]
    (.digitalWrite bone led-pin input-pin-state)))

(defn -main [& args]
  (setup-pins!)
  (js/setInterval read-input 1)) ; poll every millisecond

(set! *main-cli-fn* -main)
Now compile the clojurescript to javascript and run it on your BeagleBone.
$ lein cljsbuild once
$ node lib/digital-input.js
When you press the push button the LED should turn on, and when you release it will turn off.
Reading from digital input via interrupts
In the previous example we polled a pin once a millisecond to determine whether or not the push button was being pushed, an alternative is to use interrupts. We will use the same circuit that we wired up in the previous example. We now can be notified and react to an event (a button being pressed in this case) rather than continually having to check to see if something has happened. We use the [attachInterupt()][attach-interrupt] function bonescript provides.
On your BeagleBone and create a new directory and a file named project.clj with the following contents:
(defproject cljs-beaglebone-digital-input-interrupts "0.0.1"
  :description "Demonstrates reading digital inputs on a beaglebone"
  :license {:name "Eclipse Public License"
            :url "http://www.eclipse.org/legal/epl-v10.html"}
  :plugins [[lein-cljsbuild "1.0.3"]]
  :cljsbuild {
    :builds [{
        :source-paths ["src"]
        :compiler {
          :output-to "lib/digital-input-interrupts.js"
          :optimizations :simple
          :target :nodejs
          :pretty-print true}}]}
  :dependencies [[org.clojure/clojurescript "0.0-2197"]])
And create a file name src/cljs_digital_input_interrupts/core.cljs with these contents:
(ns cljs-digital-input-interrupts.core
  (:require [cljs.nodejs :as nodejs]))

(def bone (nodejs/require "bonescript"))

; Bonescript identifiers related to pins
(def OUTPUT (aget bone "OUTPUT"))
(def INPUT (aget bone "INPUT"))
(def HIGH (aget bone "HIGH"))
(def LOW (aget bone "LOW"))
(def CHANGE (aget bone "CHANGE"))

; Pins
(def led-pin "P8_14")            ; GPIO pin 14 on header P8
(def digital-input-pin "P8_18")  ; GPIO pin 18 on header P8


(defn setup-pins! []
  (.pinMode bone led-pin OUTPUT)
  (.pinMode bone digital-input-pin INPUT))

(defn button-callback [x]
  (if (= (.-value x) HIGH)
    (.digitalWrite bone led-pin HIGH)
    (.digitalWrite bone led-pin LOW)))


(defn do-nothing []
  "Does nothing"
  (do))


(defn -main [& args]
  (setup-pins!)
  (.attachInterrupt bone digital-input-pin true CHANGE button-callback)

  ; Endlessly loop doing nothing but prevents node.js from exiting
  (js/setInterval do-nothing 1000))

(set! *main-cli-fn* -main)
Now compile the clojurescript to javascript and run it on your BeagleBone.
$ lein cljsbuild once
$ node lib/digital-input-interrupts.js
Once again, when you press the push button the LED should turn on, and when you release it will turn off.